Project 1: Instructions
This assignment involved creating a clear step-by-step set of instructions on a specific topic. We had to write concise and easy-to-follow directions that included labeled steps, visuals, and applicable safety warnings. We also had to analyze our target audience and ensure that our instructions were written in a way easy for them to understand.
How to Perform a Simple Chest, Shoulders, and Triceps Workout for Beginners
By Zachary Spring – ENC3241.0W69
Have you been wanting to get started with strength training in the gym, but aren't sure where to get started? This tutorial outlines the steps required to have a successful first workout if you're just beginning to explore the wide range of benefits that the gym offers.
Strength training comes with many benefits beyond just being able to lift heavier weights. These benefits include improved cardiovascular health, reduced stress, a lower risk of injury in daily life and activities, and even improved cognitive function.
WARNINGBefore trying out a strength training routine, consult with your doctor to determine if it's the right exercise option for you.
With strength training, and exercise in general, you are taking on a certain degree of risk of injury. The steps in this guide are designed to fully educate and prepare you to mitigate that risk.
This workout is designed to be part of a workout plan known as the “push-pull-legs (PPL) split”. The PPL split consists of three different workouts, “push”, “pull”, and “legs”, intended to be completed over the span of three days. The “push” workout consists of muscles that are used for pushing actions, i.e., the chest, shoulders, and triceps. The “pull” workout makes use of muscles that pull, i.e., the biceps and back muscles. The “legs” workout works out your quads, hamstrings, calves, and glutes.
Before you get ready to work out, keep the following general principles in mind:
- Don't lift too heavy. This is the single most important reminder. You don’t need to try to impress others in the gym by lifting a weight that’s too heavy to control properly. Instead, aim for a weight that you can lift for six to eight repetitions while maintaining the correct form.
-
Don't overdo it.
Pay attention to the way that you feel during the workout. If something doesn’t feel right, stop exercising. Do not exercise through pain, as you can end up seriously injuring yourself.
DANGER
Immediately stop exercising and sit down if you feel faint or short of breath.
- Rest for at least 3 minutes in between sets. Sufficient rest allows your body to recover. Consider setting a timer to keep track of your rest periods.
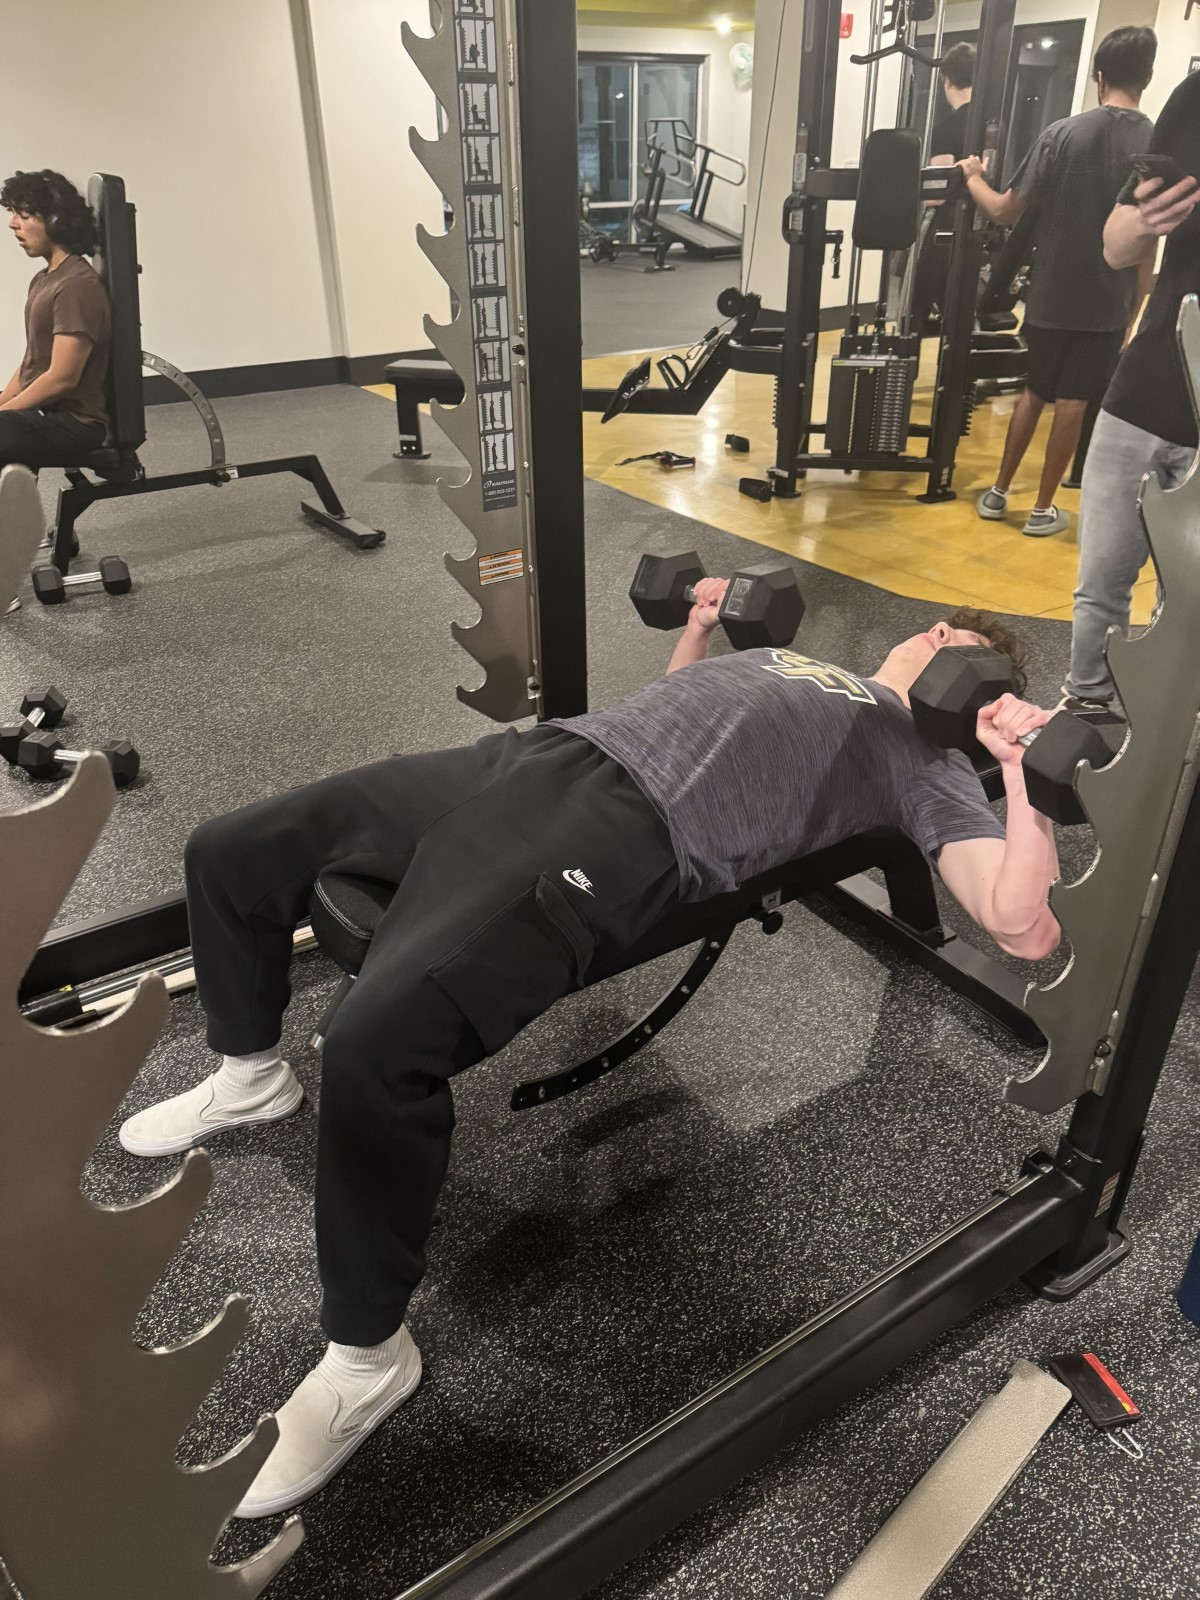
Step 1: Dumbbell Chest Press
- Locate a vacant bench and dumbbell rack.
- Adjust the bench using the handle below the seat so that it lays flat.
-
Select two dumbbells of the same weight.
Tip
Remember to select a proper weight. It’s better to err on the side of the wight being too light, as you can always increase it later.
- Sit down on the bench and place the dumbbells on your thighs, still holding them with your hands.
- Holding the dumbbells in place, lay flat on the bench.
- Keeping your knees bent at 90 degrees and arms fully extended, use your legs and arms to bring the dumbbells vertically above you.
- Angle your wrists approximately 45 degrees so that they form a “V” shape, with the point of the “V” pointing towards your head.
- Keeping your forearms perpendicular to the ground, slowly bend your elbows and shoulders to bring the dumbbells down to your chest. Do not let the dumbbells touch your chest.
- Pause for ½ of a second.
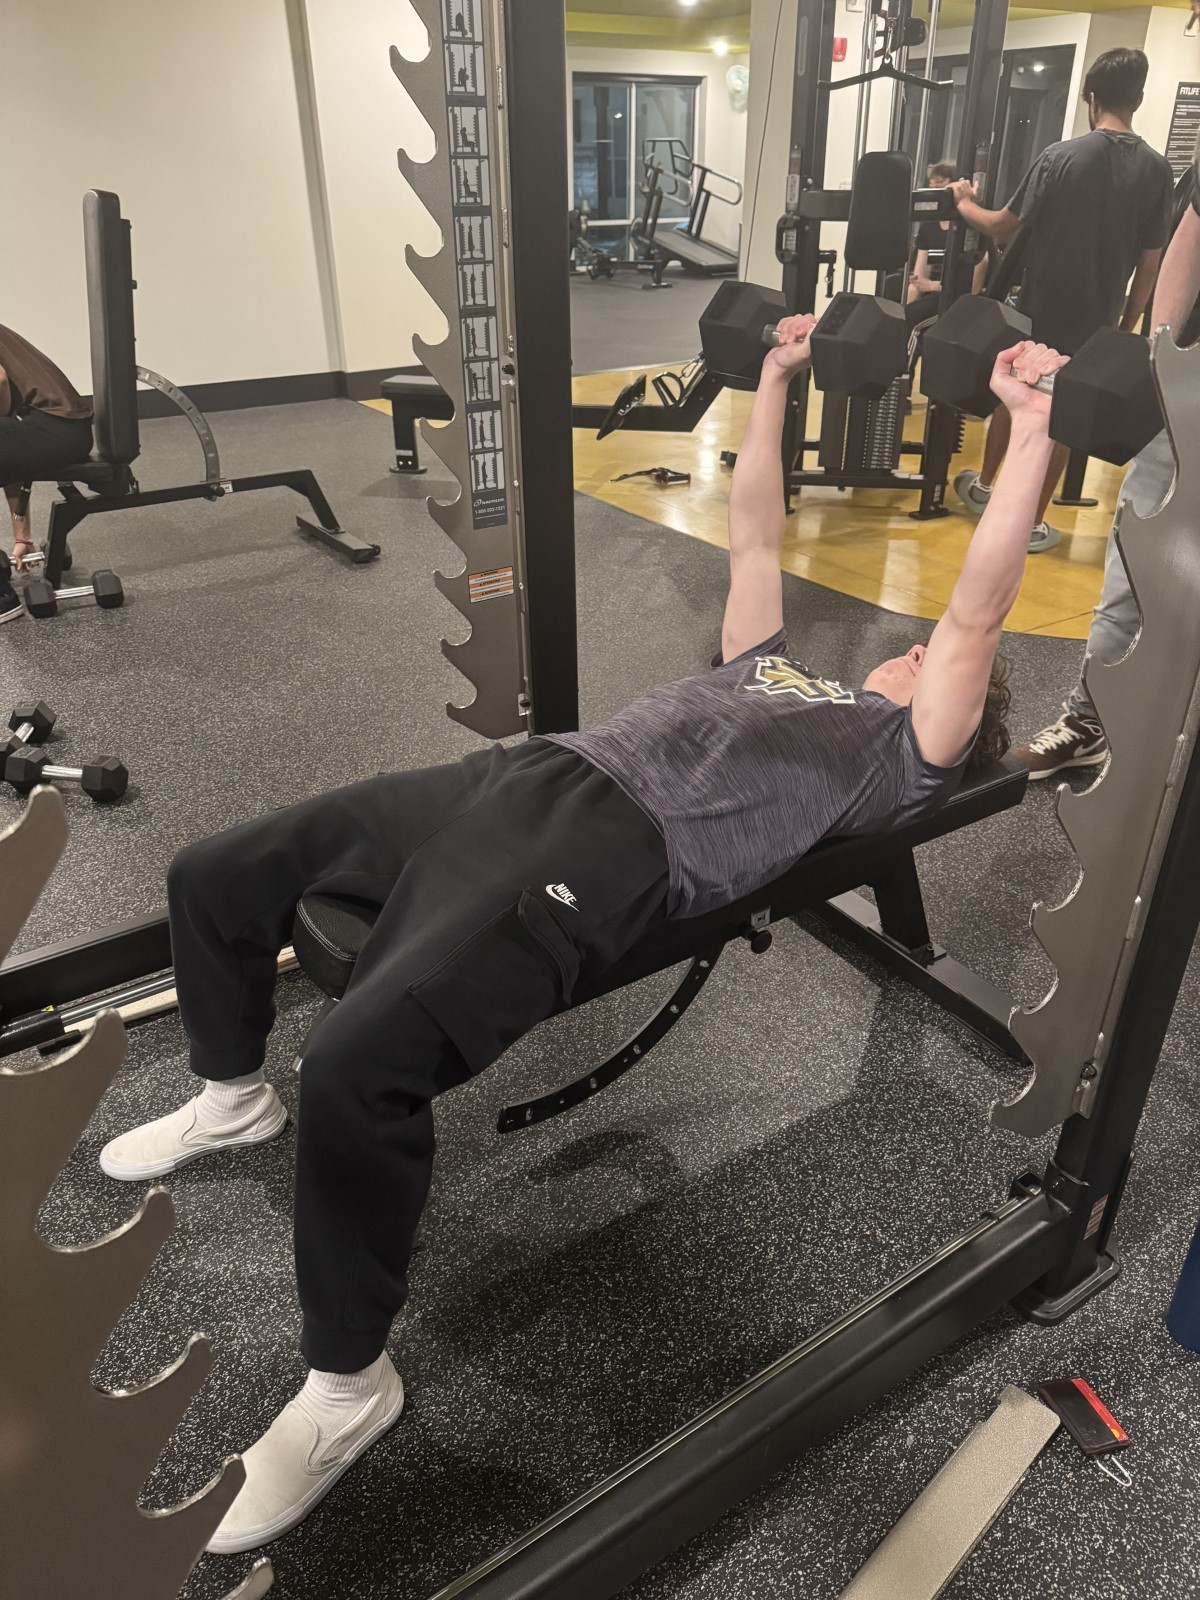
- Push the dumbbells back up so that your arms are fully extended again.
- Repeat steps 8 through 10 until you feel you are close to being unable to lift the weight off of your chest.
- Lift your legs off the bench, bringing your thighs to the dumbbells with your legs. Keep your legs bent at 90 degrees at the knee.
- Keeping your core tight, push the dumbbells forward into your legs. The momentum from the weight of the dumbbells will force you into a sitting position.
- Place the dumbbells on the ground.
- Rest for 3 to 5 minutes.
- Repeat steps 4 through 15 up to four times, optionally changing the weight of the dumbbells if it becomes too heavy or too light.
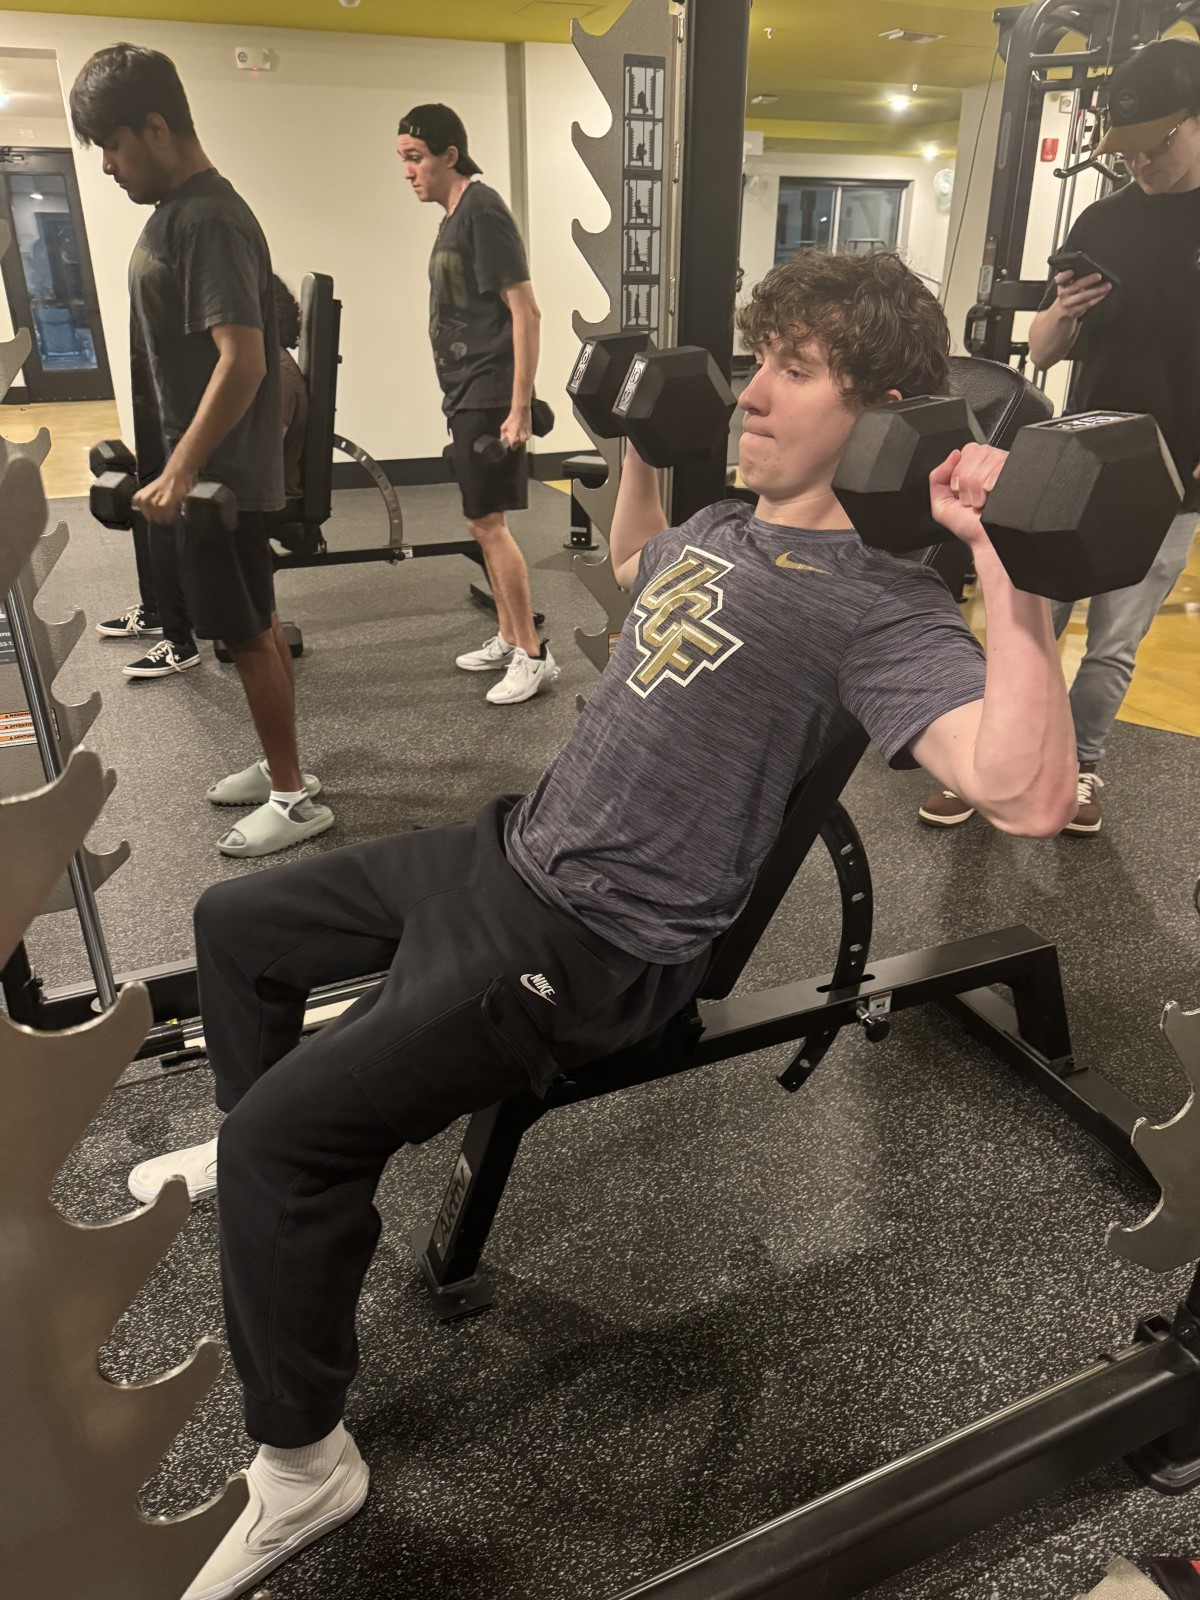
Step 2: Dumbbell Shoulder Press
- Using the same bench from the previous exercise, adjust the bench so that its backrest is about 75 degrees from the ground (almost perpendicular).
- Select two dumbbells of the same weight.
- Sit down on the bench and place the dumbbells on your thighs, still holding them with your hands.
- Place your back against the backrest of the bench.
-
In one motion, use your right thigh to “kick” the dumbbell so that you can hold it above your head just above your right shoulder.
Caution
Be careful when “kicking” the dumbbell up. Use the stronger muscles of your thigh to aid you in lifting the dumbbell. Then, use your arm to finish lifting the dumbbell and to hold it in place. Do not lock out your arm during this process.
- Repeat step 5 for the left dumbbell.
- Ensure that your elbows are bent. Your hands should be elevated slightly above your shoulders.
- Rotate your wrists so that they form a 45-degree angle, as they were during the Dumbbell Chest Press.
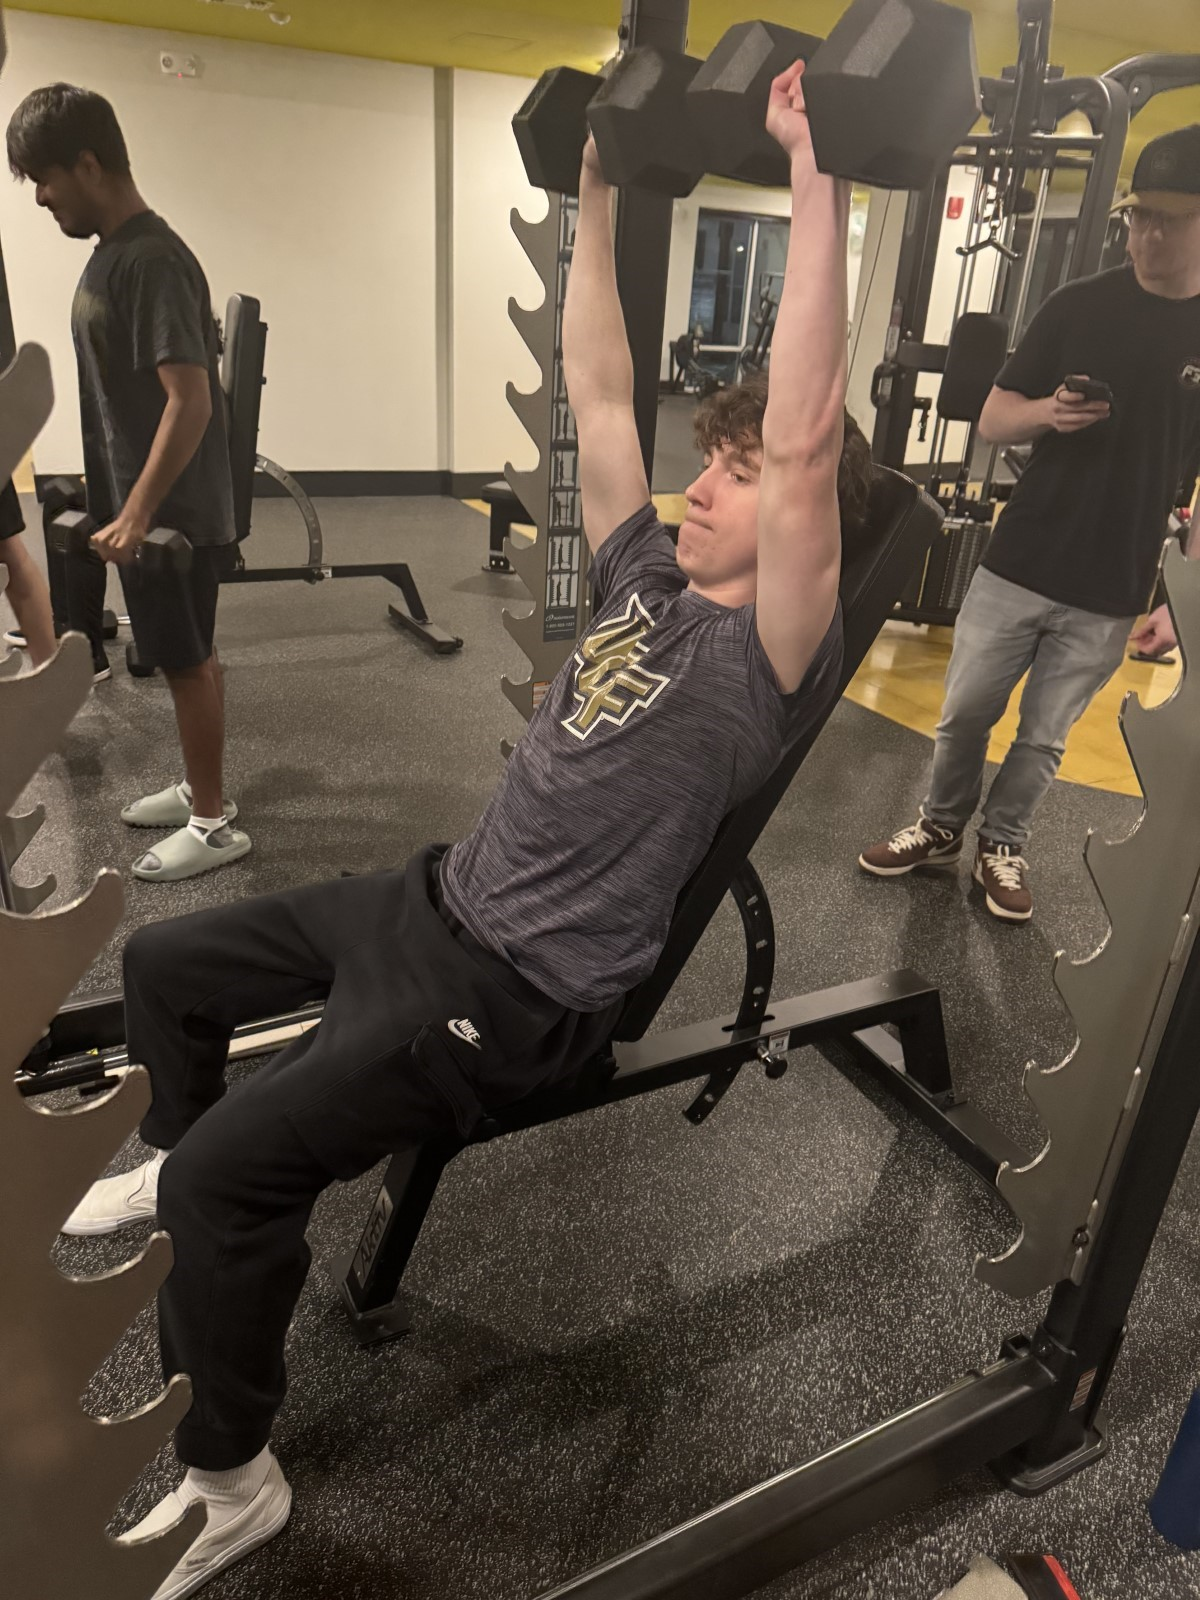
- Slowly lift the dumbbells above your head, straightening your arm at the elbow. Your arms should be fully extended above your head.
- Pause for ½ of a second.
- Slowly return the dumbbells to their original position just above your shoulder. Bend your arm at the elbow to do so.
- Repeat steps 9 through 11 until you feel you are close to being unable to lift the weight.
- Return the dumbbells to your thighs by using your arms to move them forward and down. You may raise your leg slightly off the ground to help with this.
- Place the dumbbells on the ground.
- Rest for 3 to 5 minutes.
- Repeat steps 4 through 15 up to four times, optionally changing the weight of the dumbbells if it becomes too heavy or too light.
Step 3: Cable Triceps Pressdown
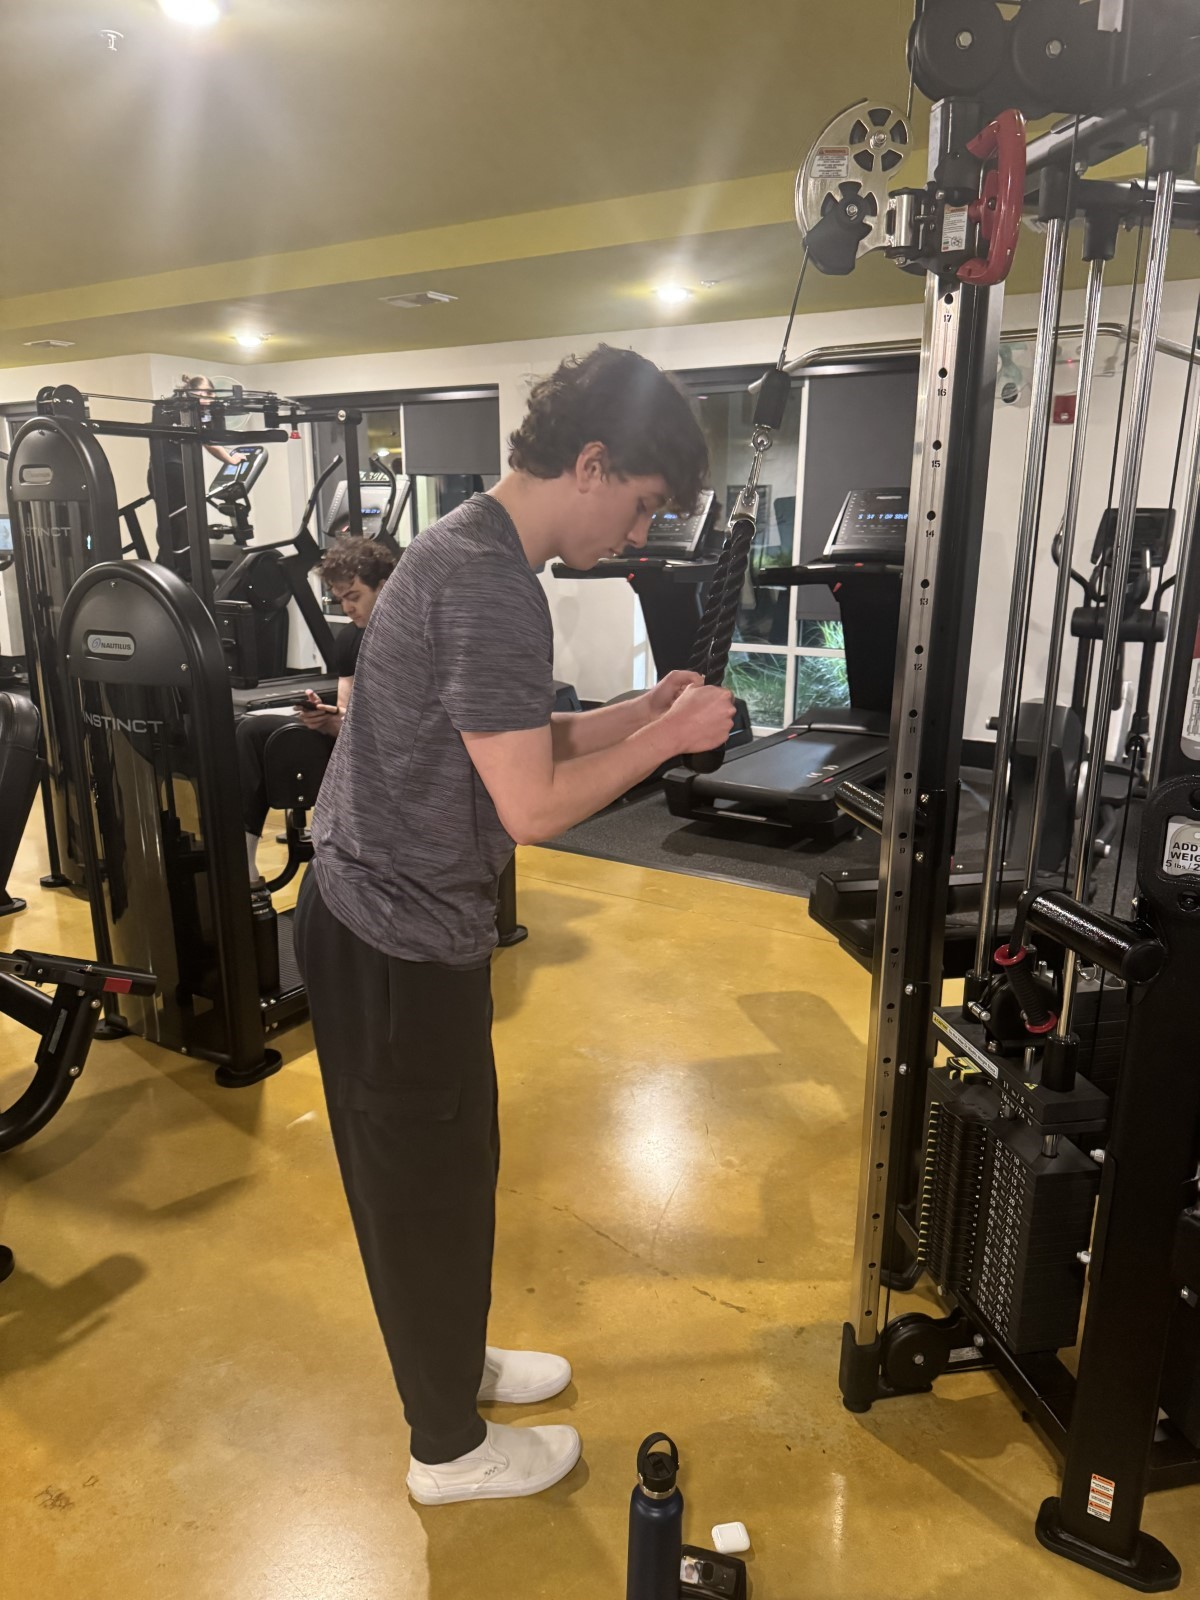
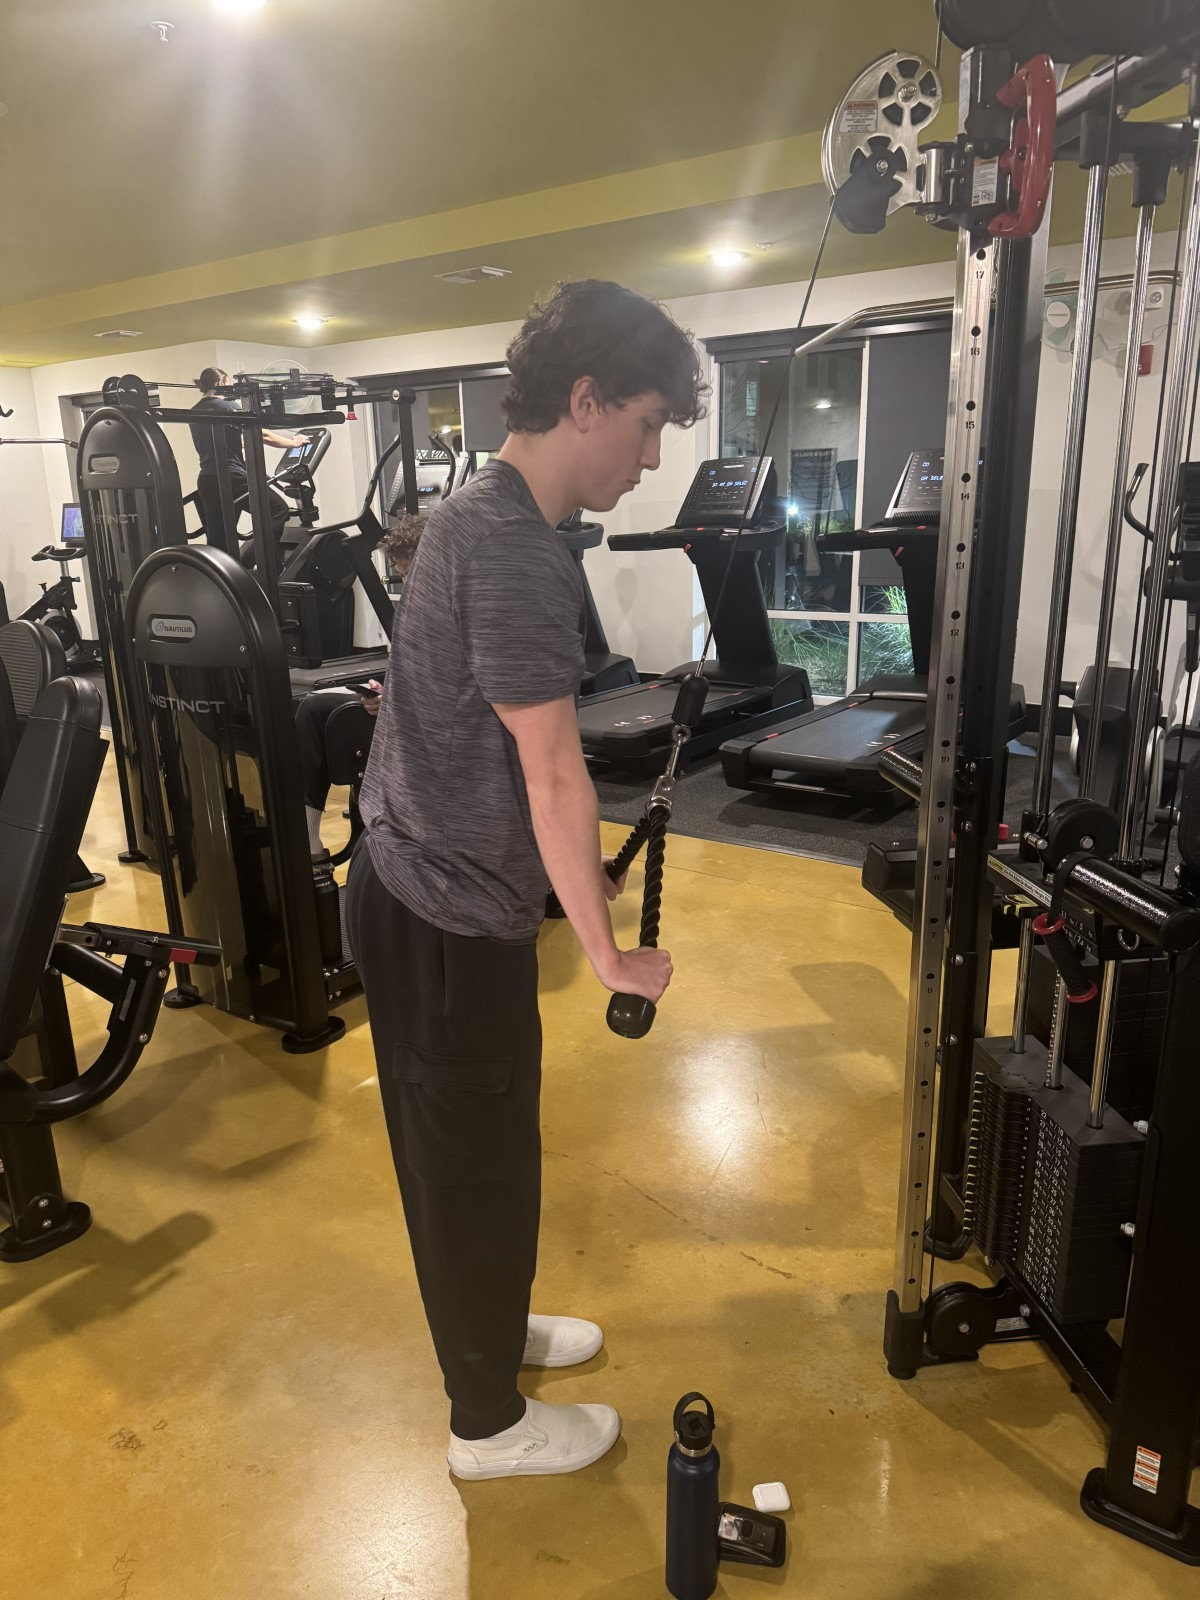
- Locate a vacant cable tower.
- Locate an appropriate pressdown attachment. A flat bar, V-bar, and rope are all acceptable.
- Attach the pressdown attachment to the carabiner on the cable tower.
- Adjust the height setting on the cable tower to be slightly higher than your shoulders.
- Use the weight pin to adjust the cable tower’s weight to an appropriate level.
- Grab onto the pressdown attachment with one hand on either side.
- Stand about one and a half feet back from the cable tower, facing towards the pressdown attachment.
- Bend slightly at the hips, so that you are leaning slightly forward.
- Grab the pressdown attachment with both hands, one hand on each side of the attachment.
- Extending with your elbow and keeping your upper arms at your sides, slowly push the pressdown attachment down towards the ground, ending with your elbows extended fully.
- Pause for ½ of a second.
-
Bending with your elbow and keeping your upper arms at your sides, slowly return the pressdown attachment to its original position, ending with your elbows bent fully.
Tip
Do not move your upper arms (from the shoulder to the elbow) during the movement. Doing so targets your lats muscles instead of your triceps. Only your forearms (from the elbow to the hand) should move.
If you’re struggling with this, try holding a towel under your armpits. Do not let the towel fall when performing the movement.
- Repeat steps 10 through 12 until you feel you are close to being unable to lift the weight.
- Let go of the pressdown attachment.
- Rest for 3 to 5 minutes.
- Repeat steps 6 through 15 up to four times, optionally changing the weight if it becomes too heavy or too light.
Congratulations, you have just completed the workout! You can do some static stretches afterwards to improve flexibility and reduce soreness the next day. Or, walk/jog for 15-30 minutes to build your endurance.
Please keep in mind that strength training only makes up a part of the work needed to support a healthy lifestyle. Mobility work (such as yoga), cardiovascular exercise, and a balanced diet are all essential.
Glossary
- Bench: a weightlifting bench. Allows for adjustment of the angle of the backrest.
- Cable tower: a gym machine consisting of a weight stack, a cable, and cable attachment.
- Dumbbell: a small weight designed to be held with one hand.
- Pressdown attachment: an attachment for a cable tower used for the pressdown exercise. May be a straight bar, V-bar, or rope.
- Push-pull-legs (PPL) split: a three-day workout split that targets all the major muscle groups of the body, dividing them by their function.
- Repetition: one instance of completion of an exercise. Consists of two parts: the concentric (part where the muscle lengthens) and the eccentric (part where the muscle contracts).
- Set: a group of repetitions performed in succession.
Audience Analysis
I will be writing instructions on how to perform a simple strength training workout at the gym. The intended audience consists of people who are new to the gym or have never been. Strength training is beneficial at all stages of life, so my target demographics are men and women ages 18 to 50 who are looking to improve their physical health. Since this article targets beginners, I don’t expect them to know a lot about the gym, including the exercises, equipment, and health and safety benefits and risks.
Considering this information, I need to write the instructions so that a wide range of audience members can understand them. I need to use clear, concise language that clearly outlines each step. I also need to include warnings about the potential for personal injury while doing the workout. I need to define key terms, such as pieces of gym equipment, and provide clear directions on how to use them. It’s also possible that the audience might get distracted during the rest periods between sets, so I’ll include a recommendation that they set an alarm on their phone in the introduction section.